Write your first Android Test
We are using IntelliJ Idea 13 CE for this example.
Create a new maven project and update the pom file with below mentioned Selenium dependency. I am assuming you are familiar with Java project creation in Eclipse or IntelliJ. Let me include a brief step by step guide to create a project.
Creating a Maven Project:
You can choose to create a Maven project in IntelliJ IDEA. This is the recommended way when using the Community Edition.
- Select New Project
- In the New Project window, select Maven on the left side of the screen as shown below. If the SDK is already defined in IntelliJ then it will pick up from there, else click New and select the installation folder of the desired JDK.

- Click Next
- Give a Maven GroupID, ArtifactID, and a Version for the project, or use the defaults.

- Click Next
- Enter Project name “AppiumDemo" and Project Location “Your Desired Location"
- Click on Finish.
Once the project is created, copy the below dependencies in the pom.xml file.
    <dependencies>
        <dependency>
            <groupId>org.seleniumhq.selenium</groupId>
            <artifactId>selenium-java</artifactId>
            <version>2.46.0</version>
        </dependency>
        <dependency>
            <groupId>org.testng</groupId>
            <artifactId>testng</artifactId>
            <version>6.1.1</version>
            <scope>test</scope>
        </dependency>
        <dependency>
            <groupId>io.appium</groupId>
            <artifactId>java-client</artifactId>
            <version>3.0.0</version>
            <scope>test</scope>
        </dependency>
    </dependencies>
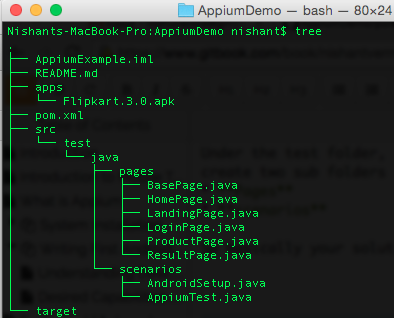
Once the project is created, created folder called apps and put the .apk file there which is your application under test.
Under the test folder, create a folder called "java", and create two sub folders
- pages
- scenarios
Sp basically your solution would look like below:
Creating the Appium Set up
Add a Java Class file under scenarios folder and name it AndroidSetup. Add the below content to the class file.
protected AndroidDriver driver;

    protected void prepareAndroidForAppium() throws MalformedURLException {
        File appDir = new File("/Users/nishant/Development/AppiumDemo/apps");
        File app = new File(appDir, "Flipkart.3.0.apk");
        DesiredCapabilities capabilities = new DesiredCapabilities();
        capabilities.setCapability("device","Android");

        //mandatory capabilities
        capabilities.setCapability("deviceName","Android");
        capabilities.setCapability("platformName","Android");

        //other caps
        capabilities.setCapability("app", app.getAbsolutePath());
        driver =  new AndroidDriver(new URL("http://127.0.0.1:4723/wd/hub"), capabilities);
    }
What do these steps do ?
- installs the apk file (application) on the connected device,
- start the application
- inform the appium server which kind of session we are interested in (via Desired Capabilities)
- give you the driver object which is of AndroidDriver type
Once you get the driver, from there on it's more like the Selenium usage of the appium driver and familiar method calls.
What next from here?
The next logical step from here is to create Page class files for different pages in the app and then create an according test class file. However to test the code just written, you can write a small piece of code as below:
    @Test
    public void helloTest()
    {
        String app_package_name = "com.flipkart.android:id/";
        By userId = By.id(app_package_name + "user_id");
        By password = By.id(app_package_name + "user_password");
        By showPassword = By.id(app_package_name + "show_password");
        By login_Button = By.id(app_package_name + "btn_login");

        driver.findElement(userId).sendKeys("[email protected]");
        driver.findElement(password).sendKeys("testvagrant123");
        driver.findElement(showPassword).click();
        driver.findElement(login_Button).click();
    }
I am sure you would have question that why we are using "app_package_name", which is explained in the chapter "Exploring UiAutomatorViewer".
Post this set up method you can write your normal automation test (Selenium types). Sample code would look like:
driver.findElement(userId).sendKeys(“[email protected]”);
driver.findElement(password).sendKeys(“password”);
driver.findElement(showPassword).click();
driver.findElement(login_Button).click();
We have created a project in github to help you with the basic framework setup using Appium. Below is the github link.
https://github.com/testvagrant/AppiumDemo
The above project uses Flipkart android application, which is bundled along with and is present in the "apps" folder. The code is tested on this version of Flipkart app and works well to show the concepts.
In the coming chapters we will understand Desired Capabilities in much details.